
Writing React - Part 1 : Coffeescript
Last week I gave a talk on building a chess game using Ruby on Rails and ReactJS. The questions and discussions afterwards reminded me of the struggle of starting with a new framework - and prompted me to write up our experiences with adopting an edge framework into an existing app.
If you are interested in this talk (or even attending any future talks - if you are lucky enough to live in Galway), here are links to the presentation, code and event
Just over a year ago we began our journey into using ReactJS with OnePageCRM. Since then we have converted parts of our application into React. It isn’t an easy transition, and we experienced a wide variety of problems trying to integrate a new view rendering framework into an existing application without a full rewrite.
One problem with most JS frameworks is a lack of resources on how to design, build and implement non-trivial systems. Todo list and example apps are all great for showing off how great / easy / efficient your framework is. But learning how to adapt it to your own DSL, frameworks and applications is an uphill struggle. I’m going to give some insights into how we work with React, Reflux and some related libraries - what problems were experienced and how they were fixed / paved over. Please drop a comment if you would like to ask any questions.
##Introduction to React
React was developed by Facebook to fix User Interface (UI) consistency - interacting with one part of the complex page wouldn’t always update a notification or unread counter. Whatever you hear about performance improvements, this is the core feature of React. It is a Declarative view rendering library which depends upon a uni-directional data flow. It isn’t a fully fledged framework like AngularJS or Ember
###Components
In React, a UI is written via a series of components. These are custom versions of HTML elements (<div>, <span>, <a> etc. ), which comprise of both visual elements and some self-contained logic. In essence, it’s just another web components implementation. These components can be nested and reused, just like HTML elements.
HTML’s nested DOM structure is a great way of representing UI. But it can get cumbersome. When you have a defined and strict UI, you will have to keep on repeating yourself, using the same nesting and css classes for common elements.
This is similar to writing a game and not being able to get productive because you keep on operating on int X, int Y and int Z and manually manipulating them with matrices. You get stuck down with the low level and lose oversight. Somewhere an X and Y co-ordinate will be mistakenly swapped and errors occur. You should just move on to defining Coordinate, Vector and Object classes and abstract away the details.
React components enable you to use this abstraction for those nitty-gritty HTML components. Components can be inherited from (given an ES 6 + compatible language with classes), or wrapped in other components to create Higher Order Components (HOC).
###Uni Directional data flow
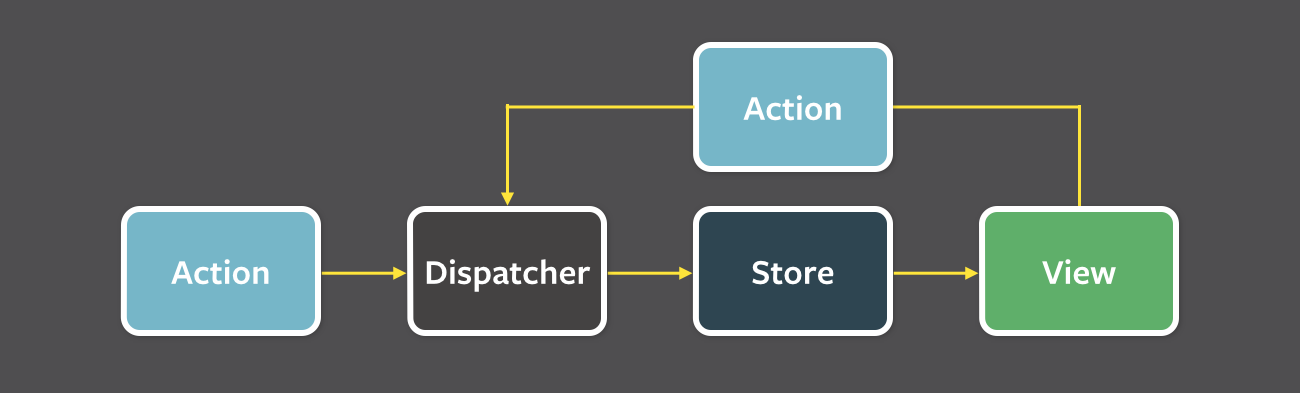 Uni-directional data flow of React
This is what makes React special. Traditionally, web developers would make web systems interactive by listening for user input events and modifying the HTML based on these. This is fine for making a web page interactive, but when writing full web applications this becomes brittle. The order in which the view is manipulated becomes important. Code is duplicated and modified for slightly different elements. One events modification can break another listener - so expensive event delegation is used. As edge cases are discovered, they are easier to patch up than resolve the source of the issue.
The unidirectional data flow of React solves many of these problems - but only if strictly adhered to. As per the image below, data can only flow from a parent component to a child component, trickling down through the DOM. This means the application’s state won’t suddenly be modified by a child component.
For a component to change the state, it has to trigger an action which modifies the data at the top level. This can be done using only react - by passing a callback function from the root parent component to child components. This is fine for example code but for large applications a more robust methodology is used; the Flux architecture. FluxJS is Facebook’s own implementation of this architecture, but there are many others. The architecture boils down to having a data store outside of React which acts as a publisher / subscriber. The store subscribes (ie. listens) to actions, and once its data is updated via an action, it publishes this to any listening React components, from which the data trickles down to all other components.
###Let’s write some code
Now to dive into some code. If you’ve looked at any React sample code, you will have come across this syntax:
class Welcome extends React.Component {
  render() {
    return (
    <div>
      <h1> Hello, {this.props.name}</h1>
    </div>
    );
  }
}

ReactDOM.render(
  <Welcome name="Liam" />,
  document.getElementById('mountpoint')
);
This is a React component written as an ES6 class, using the JSX JavaScript preprocessor. This lets you write XML syntax in your JS, meaning your components will look a little more like HTML. You don’t have to use JSX, but it is advised and most resources online for React are written in it. Personally, I’m not a fan of this syntax. It reminds me of traditional server-side templating / view rendering languages such as PHP or Ruby’s ERB. In these you can embed code in your HTML. JSX reverses the process and you write HTML in your JS code. This means you break out of the flow of one language to write another, which I find disruptive and can wreak havoc with your editors syntax highlighters.
You can of course write the exact same code in plain old JS (ES6):
class Welcome extends React.Component {
  render() {
    return (
    React.createElement('div', null,
      React.DOM.h1(null,
        "Hello, " + this.props.name
      )
     );
  }
}

ReactDOM.render(
  React.createElement(Welcome, {name="Liam"}, null),
  document.getElementById('mountpoint')
);
Extra boilerplate code is needed without the JSX syntax. There are two ways of creating a DOM element:
by passing the element name as a string (used for div above):
React.CreateElement('elementName', props, children);
or by using a Factory function, as supplied by React (used for h1 above):
React.DOM.elementName(props, children)
You can also create your own factories from your own component classes using React.createFactory(klass)
It’s really up to everyone themselves to decide which syntax they prefer, though the plain JS will get very verbose once you have deeply nested components with conditional logic.
###Coffeescript to the rescue!
Let me present you with the third option of using Coffeescript to write React. I chose Coffeescript as it is already in the Rails stack, and it makes for some very clean syntax.
{div, h1} = React.DOM

class Welcome extends React.Component
  render: ->
    div {},
      h1 {},
        "Hello, #{@props.name}"

WelcomeFactory = React.createFactory Welcome

ReactDOM.render(
  WelcomeFactory { name: 'Liam' }
  document.getElementById 'mountpoint'
)
This example is both shorter and neater than either JSX or JS - but I do use some nifty Coffeescript tricks, so let’s go over them:
####General Syntax
I would advise you to read a little about coffeescript via The Little Book on Coffeescript and just installing it and trying it out via the interactive coffee console. Here is a quick run down of the core features:
- Coffeescript is a superset language of JS. That is, it is transpiled to JS for execution in the browser
- It forgoes excessive brackets in exchange for indentation to show nesting
- Functions are written as
->arrow functions.(x) -> nullis equivalent offunction(x){return null;} - As you may have noticed above, the last expression from any block (function, loop etc.) is implicitly returned. No need for
returnstatements (though they are still valid) . - To call a method, parenthesis are only needed if there are no arguments being passed to the method.
- Objects can be declared without curly braces. The same applies to Class definitions:
obj: a: 1 b: 2 c: d: 3 # => {a: 1, b: 2, c: {d: 3} } @is equivalent ofthis- There is lots of syntactic sugar for conditional logic
isis the same as===isntis the same as!==unless ...is the same asif( !(...) )false,off,noare the same asfalsetrue,on,yesare the same astruevariable?is the same as ` typeof variable !== undefined && variable !== null`- for loops are comprehensions and are awesome
- given an array
ar, you usefor item in ar - given an object
obj, you usefor key, value of obj
####Destructuring Assignment
Given some arbitrarily massive object, such as a library (eg. lodash, React.DOM), you are likely to only use a small subset in each file. If the library has a long name, it makes your code longer and more typo prone. With the destructuring assignment you can pluck just the values from the object which you care about and place them into local variables:
# let's create an object:
charCodes =
  utf8:
    A: 41
    B: 42
    C: 43
    D: 44
    E: 45
    F: 46

# now assume I only need A and C in part of my code
{ A, C } = charCodes.utf8

A
# => 41

C
# => 43
####Nested function calling
This is a core part of Coffeescript which is easy to get wrong initially. The code from the above render method with an added span:
  render: ->
    div {},
      h1 {},
        "Hello, #{@props.name}"
      span {},
        "Welcome to my sample code"
is equivalent to this JS:
  render():
    return(
      div({},
        [h1({}, "Hello, " + this.props.name),
        span({}, "Welcome to my sample code")]);
    );
There are two things to notice here:
- The comma at the end of the line followed by an indented line means we are passing the second property (
children) to the parent react component - As both
h1andspanare nested on the same level, and neither ends with a comma (after the function call, ie. after the child string), coffescript passes them as an array to become the child elements of div.
Both of these combined mean that Coffeescript’s syntax can be used to mimic the nesting of the DOM, making it easily readable, even for those not familiar with the syntax.
###Conclusion
There we have part 1 of my foray into the world of React with Coffeescript. So far I’ve looked at what problems React tries to solve, and given a quick insight into how components can be written in JSX, JS and Coffeescript. React’s re-usable components and stateful representation of the view give a clean, modular approach to writing views in the front end.
But so far I haven’t even scratched the surface of all the cool stuff which React enables you to do. I plan to follow up by showing how components can be reused, nested, inherited and wrapped to form HOCs. If anything wasn’t clear, or if you’d like me to cover any related topics, please leave a comment.
Thank you for reading.
###Resources I like
- Arkency are actively blogging and teaching about using React with Coffeescript and Rails. Their resources give a great insight into working with this stack, and they have some nice teaching bundles on the subject at the moment.
- Read through projects written in React. A good way to learn a new framework is to read how others write it. React Rocks has a couple of ReactJS CoffeeScript examples for you too explore. They of course also offer examples in other languages. Reading code is difficult - it takes longer to read code than write it. Take a look here for some great tips on how to read code
- Read the official docs from back to front at least once. Get familiar with them and it will be easier to find what you need when you need it, and you will learn about the most time consuming “gotchas” and edge cases before getting stuck on them.
- Sign up to the official blog feed with your favourite RSS reader. This will keep you ahead of the curve for future updates and features.