Tutorial: How to handle TransactionTooLargeException in Android?
Android development often presents challenges, one of them when dealing with Inter-Process Communication (IPC).
One such challenge is the android.os.TransactionTooLargeException.
This exception usually occurs when the data passed between processes exceeds Android’s transaction buffer limit of 1 MB. If not handled correctly, it can impact your app’s stability and lead to a spike in crash sessions.
In this article, we’ll use a real-life example from our day-to-day life and show how to handle this exception to make sure your Android app is running smoothly.
So let’s dive deep into this tutorial!
Step 1: Track exceptions
To handle TransactionTooLargeException, you first need to know that they exist.
One of the best ways to do this is to regularly review your crash logs from Crashlytics and NewRelic (or other similar tools). Such tools allow you to monitor your app’s performance in real time and take immediate action.
Crash logs can show you that the TransactionTooLargeException is a repeated issue in your Android app. In this case, your stack trace can look like the below example.
Stack Trace Example
Caused by android.os.TransactionTooLargeException: data parcel size 1661328 bytes
android.os.BinderProxy.transactNative (BinderProxy.java)
android.os.BinderProxy.transact (BinderProxy.java:766)
android.app.IActivityManager$Stub$Proxy.activityStopped (IActivityManager.java:4867)
android.app.ActivityThread$StopInfo.run (ActivityThread.java:4238)
android.os.Handler.handleCallback (Handler.java:790)
android.os.Handler.dispatchMessage (Handler.java:99)
android.os.Looper.loop (Looper.java:210)
android.app.ActivityThread.main (ActivityThread.java:7080)
java.lang.reflect.Method.invoke (Method.java)
com.android.internal.os.RuntimeInit$MethodAndArgsCaller.run (RuntimeInit.java:523)
com.android.internal.os.ZygoteInit.main (ZygoteInit.java:863)
Step 2: Run a few tests
It’s good to have tools for monitoring and diagnosing TransactionTooLargeException issues. They can give you some important context on the affected devices, Android versions, etc.
But having these tools is not enough. Unfortunately, they cannot point you to the exact line of code causing the issue. This can make it hard for you to find the cause of the problem. This gets even harder if you have a complex legacy code to work with, with thousands of lines of code to go through.
Develop hypotheses
From the stack traces above, it is clear that the issue is related to large data transactions. It is just an initial assumption. You need a detailed review of user scenarios and data handling practices.
In this case, your possible suspects are:
- Data passed between services and the application.
- Large bundles passed between activities or fragments.
- Saving extensive data during activity or fragment state preservation.
- Large bitmaps or heavy data loads from content providers.
Test your hypotheses
By creating a test scenario with an excessive dataset, you can reproduce the issue.
In our case (we have a mobile CRM app), when faced with this issue, we did the following:
- Open an account with many contacts and detailed data.
- Paginate through main screens.
- Switch between different tabs and navigate back and forth.
- The app crashes infrequently after multiple operations.
Use appropriate tools to speed up the process
TooLargeTool can help you debug TransactionTooLargeException on Android faster.
You can use it to log and identify large transactions. This tool can show what lifecycle events are saving excessively large bundles.
Step 3: Analyze the results
In our case, the problem was with onSaveInstanceState.
With the help of TooLargeTool, we traced TransactionTooLargeException back to large lists of complex objects being saved in fragment states. These objects, including deeply nested sub-objects, inflated the size of the Bundle during lifecycle events like screen rotations or app backgrounding.
We arrived at this conclusion from the output we got from TooLargeTool:
D/TooLargeTool: MainActivity.onSaveInstanceState wrote: Bundle92652758 contains 8 keys and measures 867.3 KB when serialized as a Parcel
* androidx.lifecycle.BundlableSavedStateRegistry.key = 864.9 KB
D/TooLargeTool: StreamFragment.onSaveInstanceState wrote: Bundle168969553 contains 17 keys and measures 572.6 KB when serialized as a Parcel
* stream.contacts = 567.7 KB
D/TooLargeTool: ContactsFragment.onSaveInstanceState wrote: Bundle129379089 contains 21 keys and measures 178.7 KB when serialized as a Parcel
* contacts.contacts = 170.5 K
….
By developing hypotheses, testing them, and then analyzing the output from TooLargeTool, we were able to identify the root cause of TransactionTooLargeException.
Once you’ve identified the root cause, it’s time for the most exciting part—finding a solution!
Step 4: Find a solution
Our findings led us to rethink our approach to data handling and state management.
Instead of rushing to a hotfix, we brainstormed a few possible solutions:
- Optimize Data Handling: Pass only essential and lightweight data to reduce the
Bundlesize. - Use ViewModel and LiveData: Manage and retain large datasets across configuration changes without relying on IPC.
- Implement Custom State Management: Create tailored solutions to prevent automatic bundling of large data, reducing the risk of oversized transactions.
Here’s a quick breakdown of what we did and why.
Identifying essential data
We began by reviewing all the data being saved in onSaveInstanceState.
Our goal was to identify which parts were truly necessary for restoring the UI state. Anything that didn’t need to be there was removed.
So we looked at how data was being stored in fragment states. We asked ourselves, “Is all this data really necessary?” If the answer is “no”, it was time to get rid of it.
So here’s what we did:
- Trimming Down Fragment States: We took a close look at the data being saved in fragment states and decided to keep only the essential parts that were truly necessary for restoring the UI.
- Selective Storage: We focused on storing only critical information required for state restoration, ensuring that the
Bundlesize remained small and manageable.
In short, to address the TransactionTooLargeException issue, we first stripped out unnecessary or large objects that didn’t need to be there.
Building a Custom State Manager
Next, we needed a way to manage the state of our app.
The goal was to reduce the amount of data saved by the system, especially during state restoration, and prevent large transactions that could exceed Android’s IPC buffer limits.
- Custom State Saving: We implemented custom mechanisms for saving state, focusing only on what was absolutely necessary. This meant carefully selecting which data to save in
onSaveInstanceStateand excluding anything that wasn’t critical to the UI’s immediate restoration. - Using Persistent Storage: For large or non-critical data, we turned to persistent storage solutions like SharedPreferences or a local database. This data wasn’t bundled directly in the
onSaveInstanceState, but instead, reloaded asynchronously when the app was restored.
Example of a possible solution
Original Implementation (problematic)
Initially, our approach to saving state was causing the issues:
@Override
protected void onSaveInstanceState(Bundle outState) {
     outState.putSerializable(mExtraBase + getListType(), stripEmpties(getItemsList()));
}
This code saved a large list directly in the Bundle, which led to the crashes.
Optimized Implementation (solution)
We took a different approach to fix this issue:
1) Use Local Database
Instead of saving the entire largeDataList in the saved state, we opted to store it in a local database.
2) Save Data to Database
We saved the largeDataList to the database using a solution like Room or SQLite, ensuring that the data was safely stored without affecting the Bundle size.
3) Remove Large Data from onSaveInstanceState
Finally, we removed the need to save largeDataList in onSaveInstanceState:
@Override
protected void onSaveInstanceState(Bundle outState) {
    // No need to save largeDataList here anymore
}
Step 5: Test your solution
Once you’ve identified the problem, found a solution, and implemented it, it’s still not the time to relax.
Now you need to test it and make sure that it’s working properly and causing any new issues.
In our case, we did extensive testing to confirm that our solution was indeed effective in resolving TransactionTooLargeException. In our testing, we used large datasets to ensure that our Android app stays stable under various conditions.
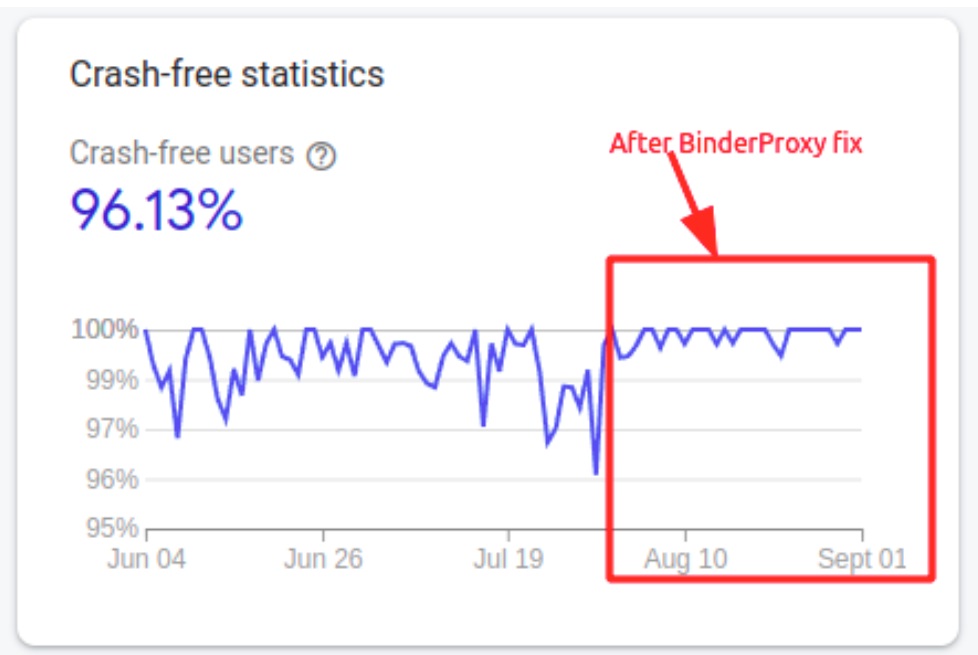
After deploying the solution, crash reports related to TransactionTooLargeException showed that the app’s stability improved significantly:

Conclusion
Dealing with android.os.TransactionTooLargeException is a complex but manageable challenge.
By understanding the complexity of Android’s IPC and using efficient data handling strategies, developers can overcome this and many similar issues.
So here’s a summary of what we discussed above:
- Understand how IPC limits work: Be aware of Android’s transaction size limits and design data handling strategies accordingly.
- Implement an efficient state management system: Avoid saving large objects in fragment or activity states. Use lightweight data and custom state saving when necessary.
- Use ViewModel and LiveData: Manage large datasets with these two components to maintain data across configuration changes without involving IPC.
- Find the right tools to help you do the job: Tools like
TooLargeToolcan provide invaluable insights into transaction sizes and help identify problem areas. - Monitor your app’s performance with tools like Crashlytics and New Relic: These tools offer visibility into IPC-related crashes and transaction sizes, helping you stay within the limits and avoid issues like
TransactionTooLargeException. - Verify data sizes: Sometimes you need to double-check the size of data fetched from the server side. This can help you prevent
TransactionTooLargeExceptionand avoid the build-up of inefficiencies.
